Sunday, June 17, 2012

A documentation of failure

So here's the thing about tatting: it's all the same simple knot, but it matters which string wraps around which.

I'm hoping that you made friendship bracelets at some point in your life--truly, I hope you still are; friendship bracelets are awesome--and that at some point in your friendship bracelet tenure you made the "Chinese Staircase," seen here

prepster friendship bracelet
(photo by mamichan)

The knot used in this bracelet is similar to one as used in tatting, but in tatting you kind of reverse the handedness of the knot every other time to keep the knots from spiraling around the way they do in the bracelet, and then you add in loops and other fancy things. But what you can imagine is that in the bracelet, there's a clear distinction between which string is forming the knots on the outside, and which strings form the core of the bracelet. This distinction is just as important in tatting, but it's WAY HARDER because there's just one string as the core.

How much harder you say? Check this out:

Untitled

Each of those loops is a failed attempt at tatting. Looks to me like about seven failures before that last beautiful perfect loop. I showed this to my husband and he said, "I'm so glad there isn't such a clear documentation of failure for all the things I've ever tried." What finally made the difference for me was watching the youtube videos by Tatted Treasures. I watched many videos, but these finally connected with me at the level I needed, so check them out if you're tat-curious!

I had enough success that I made a butterfly:

Untitled

Now I'm encouraged. I have this kooky idea of making weird tatted motifs to tack onto t-shirts and skirt hems. It's an extremely portable new craft, so it'll be a good thing to work on during the next few nomadic months of my life. My big goals are a dragon (that links to a .pdf) and a praying mantis, so stay tuned! Tatting is also a potential use of handspun silk thread that's either too thin for my knitting tastes or a little sparse yardage-wise. Anyone else acquiring new hobbies?

Friday, June 15, 2012

Finishing School, Or, I Heart My Personal Protective Equipment

I've embarked on the second stage of finishing my no-longer-brand-new Jensen spinning wheel.  When I first got it, I sanded everything, then applied a coat of pure tung oil diluted with orange solvent (both from Real Milk Paint Co, which seems to be only place that sells uncut tung oil.) 
Today, about 6 months later, I decided it was finally time to go to the next round, which involves a brisk rubdown with 000 steel wool before applying another coat of oil.  Let me tell you some stuff I have learned in this process.  I hope this information will be helpful to you, dear reader, if you ever decide to embark on oil-finishing your own spinning wheel.
  • Orange oil solvent, although naturally derived and "generally recognized as safe", is not exactly non-toxic.  The fumes smell wonderful, but they will totally give you a headache.  Use in a well-ventilated area.  Discard rags outside.  (As a side note, this stuff works great for getting that polymerized cooking grease off of your tea kettle and stovetop...but I digress.) Honestly, I think it might have been just as good to buy the hardware-store tung oil, which is cut with mineral spirits; I diluted the tung oil anyway, and I'm not sure I gained anything by going the granola route with the orange solvent, since it is flammable and has toxic vapors, just like the petroleum-based version. 
  • Tung oil is a hardening oil.  This means that if you leave it on the brush, it will harden the brush.  In case you can't tell, I need a new brush.
  • Sanding generates dust.  Sanding with steel wool generates EXCITING steel wool dust!  The steel wool package says to use gloves and protective eyewear.  Uh, what about my lungs, dude?  I strongly recommend a dust mask or respirator.  A decent respirator is not too expensive and, bonus, you can use it for mixing dye powders later on.  Seriously, the steel wool dust really freaked me out.  I vacuumed my hands, my clothes, and the surrounding area before taking the respirator off.  (And needless to say, I did this outdoors.)  In hindsight, it would have been good to wear an apron.  (Oh, and in case it's not obvious, you should also wear a dust mask when sanding with regular sandpaper.  It's not fun to inhale tiny bits of wood, even if it is lovely solid cherry wood crafted by a master artisan.)
  • Dude, there is a LOT of surface area on a spinning wheel, especially when you include the lazy kate, bobbins, whorls, and distaff.  My general method was to take all the removable parts off of the wheel (flyer, tension screw and block, treadles, footmen), and then to work through sanding all those loose bits in one sitting.  Then in a second sitting, I will sand the wheel.  Then in a third sitting, apply a coat of oil to the parts, then yet another sitting to apply a coat of oil to the wheel.  There are a lot of sittings. 
  • The steel-wool rubdown, though tedious and slightly scary, is really quite gratifying.  It smooths out raised wood-grain and knocks away any bits of dust that settled in the first coat of finish.  Wood that was looking sort of dried-out and neglected after my six months of...er...neglect, now looks satiny-smooth and delightful!  Can't wait to get the oil on.
Sorry about the text-heavy post!  I promise pictures next time.

Monday, June 11, 2012

Finding inspiration in the oddest of places

Picture warning! If a catalog-type photo of a lady in her undies might get you in trouble at work, save this post to read later! Otherwise, read on!

One of my self-determined spinning goals for this month was to try core spinning. Jenny Jo had told me about her core spinning class, I'd been seeing lots of cool art yarn on Ravelry, and I was curious. Youtube sure is great when curiosity strikes (we'll talk about the tatting rabbithole I fell down another time). I watched a series of videos by JazzTurtle Creations, and they seemed plenty straightforward. I grabbed for some deep spinning stash, some Jacob roving I'm guessing came from Meridian Jacobs, from the time I went to the farm to see their baby sheep.

Untitled
I'm not entirely sure this was the best fiber for the job, but I made yarn!

Untitled
My spinning wheel (a Majacraft Little Gem) is definitely fit for spinning superbulky things like this. It's part of the reason I bought my particular wheel-- "you could spin Barbie doll heads into your yarn with this delta orifice," I'd always say when telling folks about my wheel-- and it was about time I actually tested its limits a bit. Mostly I just had to be unafraid of cranking up the tension and taking the spinning very slowly. Verdict? It was fun! I wanted to practice some more! As it turned out, I got to mess around with my friend Cleo's drum carder the other day, and here's where the odd inspiration comes in.

If you are a woman, you may have been told by a certain type of evangelical woman that you are in all likelihood wearing the wrong size bra. I had heard this and ignored it for years. I don't have the dreaded boob muffin top! The middle part of my bras rest on my chest! However, my bras were really on their last legs, so I decided I might as well give it a go at a shop that specializes in fittings. And indeed, like many women find out, I had been wearing a too-large band and a too-small cup. I bought an arsenal of new underthings, but I let one get away. Moreover, the woman at the store, who told me she's now my personal lady-in-waiting, also told me this bra was a "fashion item" and it won't be available forever. It makes sense that bras have seasonal lines like regular fashion does; it had just never occurred to me that that was the case. I just blew my underwear budget for the foreseeable future, so I may just have to let that one go to the universe. But it's a pink bra with orange flowers!


It was right after the bra fitting experience (note: not for the modest, that experience!) that I got to play with the drum carder. What came out? A batt I like to call "fashion item."

Untitled
I also made this other one, with the idea it was an outer space/starry night kind of thing.

Untitled
Then I made more yarn!
Untitled
Untitled
These little things have just 10-12 yards each, and they are very bulky, so I'm not sure what they're good for. This really is the sticking point with art yarn. I don't want to sound unkind, but most finished objects don't particularly jive with my aesthetic sense, even if the yarn totally does. Who out there has seen beautiful art yarn projects they can point me to for more inspiration?

Monday, May 28, 2012

An embarrassment of riches

Earlier this year, my husband was visiting a childhood (or maybe tweenhood is the better word?) friend of his in Northampton, MA. When he came back, he told me that this friend said we should come back to the area for the Massachusetts Sheep and Wool show in May, and would I like to go? I don't mean to brag, but having a husband who finds sheep and wool shows for me to go to is pretty rad.

So this past weekend, we went! We went on Saturday with my husband's friend and her family. Then we went again on Sunday with fellow blogger Emily and her family. Sunday evening after the festival we went for dinner and drinks at the Dirty Truth, along with a dear friend of mine, from my days as a NYC public high school teacher, and her siblings. I really felt extremely fortunate to spend my weekend with so many fantastic people and such vibrant families. Isn't that what it's all about? The fact that the timing worked out to see everyone I wanted to see was remarkable. And all this for a a wool festival!

Massachusetts Sheep and Wool is not nearly at the scale of Rhinebeck or Maryland, but that's actually not a bad thing at all. There was no traffic, there was no shoving through barns and booths, you could find a seat in the shade easily, the events were really great, and there was no shortage of shopping to be done. This was the first festival I'd been to with competitive sheep dog trials, which my husband especially enjoyed. There was also the Lead Line Pageant, which is basically the same as the Shepherd's Lead at Maryland, the simultaneous fashion show/sheep show that's always a highlight for me. They had contests like Fleece to Shawl, and some speed/knitting contests that I'd like to be a part of at some future festival. This festival also had more angora rabbits than I feel like I've seen before. I fell deeply in love with a gray bunny with blue eyes, whom you can meet in the photo montage below.

animals_mosaic
I also loved this especially compact bunny that can fit in any narrow space in your home. Very convenient.

Untitled
It seems I fall in love a lot at wool festivals. That's part of the point of going, I suppose. I'm always interested in checking out new tools, so I tried a couple of spinning wheels. I haven't really had this experience before with a spinning wheel-- I actually bought mine without having tried it out-- but when I tried the Spinolution Mach III, I had this experience:


I really can't help that Wayne's World is a big cultural touchstone for me, but it is. Anyway, I have heretofore decided that no more money will be spent on spindles, and I'm going to start saving my pennies for that. You know, after this weekend. Because when there's a sheep and wool festival, there's some shopping.
stuff_mosaic
The yarn and combed top are from Play At Life Fiber Arts. The gradient sock yarn is pre-wound into two matching cakes, which will make fantastic socks for my mom. The fiber--it's Polwarth-- really surprised me. It's tough to win me over on pastels, but I think this will be really fun to spin into a gradient yarn. The colors are a little bit acidic even though they are so light, which is what made this special to me. The batts are from KnittinK, and the very lovely spindle that coordinates well with them is a Forrester Dervish in sapele and yellowheart with a cherry shaft.

A great weekend indeed, and so fantastic to have seen both my fellow bloggers at festivals this month before I ship out. Two festivals in one month is truly an embarrassment of riches, and now I just wonder when or where my next festival will be?

Thursday, May 24, 2012

A fun new spinning device!

At the end of June, I'm leaving New York and living out of a suitcase in various locations until January 2013, when I'll be settling down in Bloomington, Indiana. This is all for reasons related to my husband's employment situation. It's a little crazy, I'll likely be out of work for a somewhat distressingly long time, but I'm actually really looking forward to it.

Except for one problem: six months without my spinning wheel?!?! This is really silly, I know, but I love my spinning wheel and our time together. Spindles don't quite approximate the same experience, for the same reason that rigid heddle weaving doesn't compare to weaving with a floor loom to me. There's something about the whole body coordination of it that makes it such an enjoyable experience for me. It makes me think I should probably take some dance classes.

The good news is that I've come up with what I think is a great solution. Enter the kick spindle. This one is made by Jim Echter at True Creations, and let me tell you, it's fun and truly delightful. It packs up to be quite flat and fits in a suitcase very easily. There's a (beloved) Vanilla Coke Zero can in the photo for scale.
Untitled
(When I purchased the kick spindle, it came unfinished. That's my own work with tung oil-- thanks, Jenny Jo!-- and wood beams to bring out the lovely cherry color.)

It very quickly sets up to look like this:
Untitled
How to spin on it? Well, it's similar to spinning on a charkha, supported spindle, or a great wheel in that you're spinning off the tip of the spindle, at roughly a 45 degree angle from the spindle, so that the twist goes into the fiber and leaves the yarn already packed onto the spindle intact. Since your foot is making the wheel spin--the part you "kick" is the shaft below the big flywheel-- you have both hands free to draft however you like. A leader is pretty much necessary to get things started.
Untitled
I forgot to get a photo of the unspun fiber, but I had a little sample from someplace or another, and I spun up a third of it into a wee little cop on the spindle. I'm looking forward to seeing how much I can pack on there.
Untitled
Here are the three plies of my sample yarn, wound onto mini tennis balls (meant for mini dogs, but great for holding singles waiting to be plied).
Untitled
I could have plied on the kick spindle, just by kicking in the opposite direction, but I called on one of my drop spindles for the task.
Untitled
A little sample skein is born! This is a three ply, and I didn't measure the wraps per inch, but by eyeballing it, it looks like a heavy fingering weight to me.
Untitled
No doubt you'll see more products from this very cool new toy in the next six months. Is there anyone else who, like me, enjoys involving both hands and feet in the creative process? Am I just a dancer in denial? I've always been wary of sheep shearing, but maybe I should give it a try, since that's clearly a whole body experience...

Tuesday, May 15, 2012

Maryland Sheep and Wool Roundup!

Maryland Sheep and Wool! It's awesome, as always. This year I went with Jenny Jo and another friend, Tracy. We bought things, we ate things, we watched things. One of the highlights for me this year was trying some new tools, in particular spinning wheels and accessories. I fell rather in love with the Pocket Wheel, and I was sorely tempted by the Woolee Winder, a spinning wheel accessory that winds the yarn evenly onto the bobbin, allowing you to spin without having to stop and adjust how the yarn is winding onto the bobbin. It means you can just spin, spin, spin, only having to stop to sip your adult beverage of choice. I was also very charmed by this antique loom that functions similarly to the inkle loom I was smitten by at Rhinebeck last year.
Untitled
There are animals to pet, of course. I discovered I really love Karakul sheep.
mosaic2
And sheepdogs.
Untitled
And tap dancing puppets. I love these.
Untitled
And shopping! Let's have a look-see at my haul.
mosaic1
There's two bullseye bumps from Loop, one from Spinabit (the camera can't capture the electricity of the blue, but I assure you, it's there, the stuff unicorn dreams are made of), a set of three from Hobbledehoy, a skein of yarn from Marigold Jen, and one from Miss Babs. If that last skein seems a little out of my color story, which may best be classified as "loud," it's because that skein is for husband socks, whose color story could best be classified as "light blue."
Plus I had to buy a spindle. The gorgeous spindle is made of Karelian birch and is a Bosworth. I love everything! I regret nothing!
Untitled
The other big huge new thing is that Jenny Jo and I picked out a fleece to split between the two of us. This is the first time either of us have taken such a big step in our spinning careers. I honestly have no intention of doing any of the processing of my half, and will happily ship it off so someone else can do the dirty work. It's a naturally colored merino fleece in an amazing gray from a sheep named Emma. Depending on what the finished fiber yield is from my half of the 7.5 pounds, I hope to make enough yarn for a vest or sweater. So exciting!
Untitled

Sunday, April 15, 2012

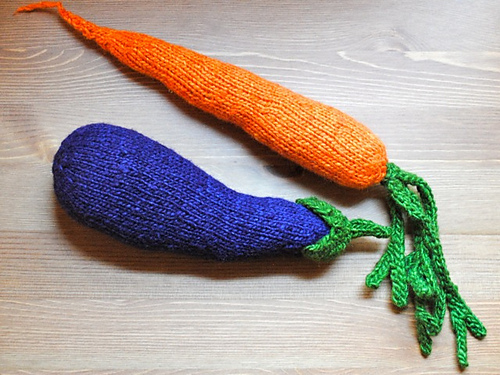
A knitted eggplant

I have never knit a stuffed animal.  I prefer stuffed vegetables -- and that's not a joke about how I'd rather be eating dinner than knitting, though admittedly, I probably would.


The latest round of veggies are for baby J -- they'll be a mobile until she's old enough to have a toy kitchen, at which point they'll turn into ingredients.  The idea is to convince her that vegetables are beautiful and awesome before she's old enough to have any reason to think otherwise!  I already have a carrot from my last round of vegetable knitting, and I just finished an eggplant.  I'm halfway through a beet, and considering rounding it off with a green pepper (peppers are hard).

There are plenty of patterns for veggies already out there, but I found them all too cartoony; they were symmetric and regular in a way that vegetables never are.  So, the first vegetables I knit came about after some very careful measuring:

This newer set of veggies are based on the notes I took that time, and a decent amount of making it up as I go along too.

In some ways, the knitting isn't hard.  Knitting tubes is easy; making tubes taper by judiciously decreasing is easy too, and then you can make them curve using short rows, and voila -- an eggplant (carrot, beet, potato, butternut squash, zuccini, etc) is born.  But on the other hand, this knitting is a bit of a pain in the ass -- whenever I put the project down, I need to make note of exactly where I am, because I can't "read" my previous knitting in the way you can with a more regular pattern.

But!  On the other other hand, these vegetables are impervious to small-to-medium sized mistakes. They're supposed to be organic-looking, meaning slightly irregular and asymmetrical, and every one is an individual.  Plus, you can easily knit one in an afternoon, so needing an attention span isn"t such a big deal.

Thus, I fittingly present you with, not a pattern, but a recipe for a knitted eggplant:

Ingredients:

  • Worsted or Aran weight yarn; about 45 yards of purple and 8 yards of green.  (use a different size yarn if you want to knit a different size eggplant, or are brave about resizing patterns.)
  • 1 yard of scrap yarn;
  • Size 3 or 4 needles (or whatever you need to get a very tightly knit fabric);
  • Fiber fill;
  • Yarn needle;
  • Safety pin or locking stitch marker;
  • Willingness to knit a simple lace pattern in the round without being told where the stitches should go on your needles.


Skills and abbreviations:

  • Cast on (CO);
  • Provisional cast on (PCO);
  • Bind off (BO);
  • Decrease stitch of your choice;
  • Decrease stitch that merges three stitches nicely (abbreviated dec 3->1; I accomplished this by slip, knit, pass slipped stitch over newly knit stitch, pass next stitch over newly knit stitch.) 
  • Short row shapping (including "wrap and turn" to make the edges nice);
  • Yarn over (YO);
  • I-cord.  


Before we begin, a word about shaping:  for the body of the eggplant, I am intentionally vague about placement of decreases, method of decreases, placement of short rows, and lengths of short rows.  This is intentional, and an essential part of this pattern!  I encourage you to be as random as possible in the placement of these elements; the result will be more organic-looking, and entirely individual.  Also, the numbers are approximate and should all be read with a +/- 20%, and I encourage you to be slightly sloppy in your counting.  Feel free, also, to add an extra short row somewhere along the way (or omit one of the ones called for).

Okay, onto the part that looks sort of like a pattern.

Knitting the body:

PCO 45 stitches in scrap yarn.
In purple yarn, knit 8 rows plain; place your safety pin/locking stitch marker at the beginning of one of the rows so that as the project progresses, you can remember where your rows begin.
Begin shaping the bottom half of the eggplant:

  • Decrease 1 stitch per row, for 4 rows;
  • Decrease 2 stitches per row, for 4 rows;
  • Decrease 3 stitches per row, for 3 rows;
  • Decrease 6 stitches per row, for 3 rows; 6 stitches remain.
  • Next cut your thread, leaving a 6 inch tail, and pull the tail through the remaining 6 stitches and tighten.  Sew in the end.  Do it now!  It will be a pain to do it later, once the eggplant is stuffed.


Next, remove the yarn of your PCO and slide the newly live stitches onto your needle(s).  With the purple yarn, begin shaping the top of the eggplant:


  • Over the next 4 rows, decrease 2 stitches total.  (Not 2 stitches each row; 2 stitches total.  I considered writing "decrease half a stitch per row for 4 rows", but decided that was even more confusing.
  • At some point in the next row, insert a short row of k stitches, for some 6<k<18.  (So, knit more than k stitches of that row, wrap and turn, purl k stitches, wrap and turn again.  In the next row, pick up the wraps from the wrapped stitches.  Consider rolling a pair of dice to select k.)
  • Over the next 8 rows, decrease 10 stitches total (not 10 each row, which is clearly impossible!).
  • In the next row, insert another short row of k stitches, for some 6<k<18.  Use a different value of k -- maybe roll the dice again!
  • Over the next 16 rows, decrease 8 stitches total.
  • In the next row, insert the final short row of k stitches, for some 6<k<12, using yet another value of k.
  • Over the next 8 rows, decrease 4 stitches total.  About 20 stitches remain.  Pause your knitting to mostly fill the body of the eggplant with fiber fill.
  • Decrease 2 stitches per row for 2 rows.
  • Decrease 4 stitches per row for 1 row. Add in a little more fiber fill.
  • Decrease 6 stitches per row for 1 row; about 6 stitches remain.
  • Cut your yarn, leaving a 6-inch tail, and thread it through these 6 stitches.  Add in a little more fiber fill, until the eggplant is pleasingly plump, and then pull the yarn tail tight.  Sew in the end.


Knitting the cap:

  • CO 36 stitches in green yarn.
  • First row: (k1, yo, k4, dec 3->1, k4, yo)x3.
  • Second row:  repeat first row.
  • Third row: (k5, dec 3->1, k4)x3
  • Fourth row: (k4, dec 3->1, k3)x3
  • Fifth row: (k3, dec 3->1, k2)x3
  • Sixth row: (k2, dec 3->1, k1)x3
  • Seventh row: (k1, dec 3->1)x3.  6 stitches remain.
  • move all stitches to one needle.  Knit an inch of i-cord, while decreasing down to 3 stitches.  bind off, cut a 9-inch tail, and thread this back through the i-cord tube.  

Now you'll use the tail of the green yarn to attach the cap to the body.  I suggest first threading it through the 6 stitches at the top of the body, then sewing down the three corners of the cap (pass the yarn through the inside of the eggplant to connect the different corners, so your hat will be firmly attached.)

Enjoy your eggplant!  And, perhaps, make yourself a delicious eggplant ragout as an award for a job well done.